Training · Nov 3, 2026
Push-Up Plus: The Extra Inch That Actually Works Your Chest
Most push-ups stop at lockout. The plus adds one deliberate move at the top that changes what your chest and shoulders have to do.
YourFit · Push-up plus · chest
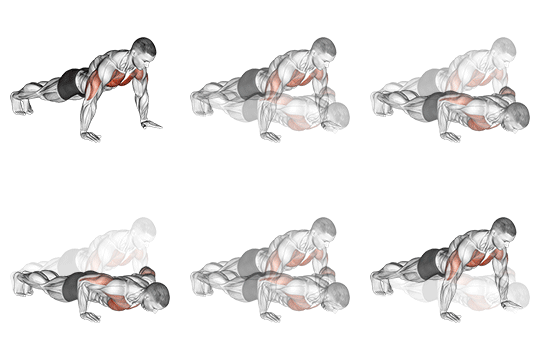
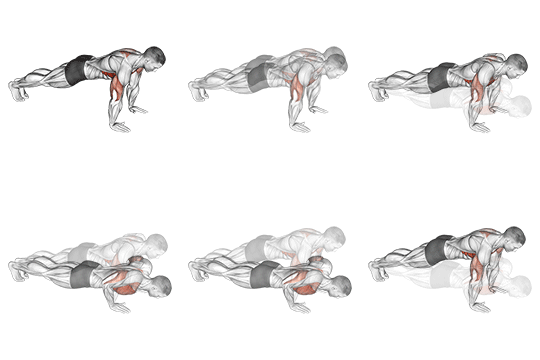
A standard push-up ends when your elbows straighten. The push-up plus keeps going. Once your arms are extended, you drive your upper back toward the ceiling, separating your shoulder blades as far apart as they will go. That last motion — called scapular protraction — is short, maybe an inch of visible movement, but it demands that your chest and the muscles around your shoulder girdle stay loaded through a range most lifters never bother to train.
The payoff is not dramatic. You will not suddenly lift more or look different after one session. What happens instead is that you start owning the top of a pressing movement rather than just passing through it. Reps become harder per repetition, so the number you can do with control drops, and that is the point. Fewer controlled reps beats a higher count of reps that stop where the work gets uncomfortable.
Setting Up Before the First Rep
Place your hands slightly wider than shoulder-width on the floor. Your fingers can angle very slightly outward if that feels more natural at the wrist, but do not go so wide that your elbows flare badly during the descent. Arms should be straight, hips level with your shoulders, heels in line with everything else. Your body is one plank from head to heels. Check it once, then stop checking and start moving.
The position has to be consistent rep to rep, because the protraction at the top is only meaningful if the rest of the body is not compensating. If your hips are sagging or your lower back is arching before rep one, the plus movement becomes noise. Spend ten seconds getting the setup right. If you cannot hold the plank position statically for at least fifteen seconds, address that before adding the plus.
What One Full Rep Actually Looks Like
Bend your elbows and lower your chest toward the floor. Keep your elbows reasonably close to your torso on the way down — not locked to your ribs, but not flaring out at ninety degrees either. Lower until your chest is just above the ground, then press back up to full elbow extension. That is where a standard push-up stops. You are not done yet.
At the top, with arms extended, push your upper back toward the ceiling. Your hips stay level. Your arms stay straight. Only your shoulder blades move, spreading apart as your thoracic spine rounds slightly upward. Hold that position for a beat — one honest second — then reverse it by drawing your shoulder blades back together before you lower into the next rep. The reversal is controlled, not a collapse.
The Cheat That Inflates Your Rep Count
The most common way people shortchange this exercise is by treating the protraction as a head nod. They let their chin drop toward the floor while their upper back does almost nothing, and they count it. Another version is the bounce — reaching the bottom quickly and using the stretch reflex to pop back up, which means the chest never has to produce sustained force. Both habits let you do more reps that mean less.
The second cheat is skipping the pause at the top entirely. Without that pause, it is easy to move straight from lockout into the next descent without the shoulder blades ever fully protracting. If you are unsure whether you are actually getting there, do a set in front of a mirror or film yourself from the side. The upper back should visibly dome at the top of every rep. If it does not, the rep does not count.
Scale It Down or Make It Harder
If the floor version is too demanding to do with control, elevate your hands on a bench or step. The mechanics are identical — same setup, same protraction at the top — but less of your bodyweight is loaded through your arms. Work at an elevation that lets you complete six to eight full reps with the pause intact. As that becomes manageable, lower the elevation gradually rather than jumping straight to the floor.
To make the exercise stricter, slow the descent to a three or four count before pressing back up. You can also add a longer pause at the bottom before pressing. Do not add extra elevation to your feet in an attempt to load it more, since there is no instruction here to do that and changing the angle changes the demand in ways that go beyond what this exercise is built around. Work the range you have with more control first.
What to Write in Your Log
Record sets, reps, and elevation if you are using one. Note whether you held the pause at the top or not — honest notation here will tell you more than the rep count alone. If you did three sets of eight with a clean pause on every rep at floor level, write that. If the pause fell apart on the last two reps of each set, write that instead. Vague logs produce vague progress.
The number to compare next week is clean reps with the pause — not total reps. If you logged eight clean reps this week and next week you do ten with the same pause quality at the same elevation, that is real progress. Adding two reps by dropping the pause is not progress; it is a different exercise. Keep the definition consistent and the week-to-week comparison actually means something.
What to watch
- Dome the upper back at the top — not a head nod, the whole thoracic spine.
- One honest second at the top before you reverse.
- Hips level the entire rep, including during protraction.
- Count only reps where the pause happened.
- Slower descent if the bottom feels rushed.